Deploy
COMMAND>_ is a complex application and relies on several other software components to work. In order to ease up the deployment process a docker-compose.yml file is provided, so assuming you have a working Docker Compose environment, the deployment process will be a matter of running a few commands.
In case you want to manually deploy COMMAND>_ in your environment there will be more steps you will need to take care of such as installing the web-server, the DBMS, etc.
Requirements
Have a look at the requirements.txt file for details. COMMAND>_ main dependencies are:
COMMAND>_ uses several external tools that you’ll need to download them separately:
Docker Compose
Assuming that you have Docker Compose correctly installed, you should be able to perform the following steps:
# 1. clone the repository
git clone https://github.com/marcomoretto/command.git

# 2. copy external dependencies (check figure below)

# 3. build
docker-compose build

# 4. start docker
docker-compose up -d

# 5. create database schema
docker-compose exec web python manage.py migrate

# 6. create admin user
docker-compose exec web python manage.py init_admin

# 7. create initial options
docker-compose exec web python manage.py init_options

# 8. create demo compendium
docker-compose exec web python manage.py init_demo_compendium demo

# 9. run daphne
docker-compose exec -d daphne daphne -b 0.0.0.0 -p 8001 cport.asgi:channel_layer

# 10. run worker
docker-compose exec -d worker python3 manage.py runworker
- That’s it! You should be able to point your browser to http://localhost and login into COMMAND>_ using:
- username:
admin - password:
admin
- username:
Note
You should have the following directory structure for the external tools
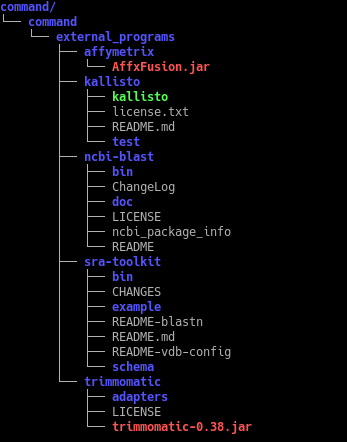
Note
You might need to rename the directory from command to cport before doing step # 2.
Manual Deploy
One easy way to understand what you need to do to manually deploy COMMAND>_ is to have a look at 2 files:
- the Dockerfile
- the docker-compose.yml file
In a nutshell, after having installed and configured Nginx (or another web-server to run Django applications), PostgreSQL, Redis, RabbitMQ and Celery, you’ll have to run:
pip3 install --upgrade pip
pip3 install Cython==0.28.1
pip3 install -r requirements.txt
Now you should be ready configure Django (check the documentation for details), create the database schema and run the application.
python manage.py migrate

python manage.py init_admin

python manage.py init_options

python manage.py init_demo_compendium demo

daphne -b 0.0.0.0 -p 8001 cport.asgi:channel_layer

python3 manage.py runworker
Note
COMMAND>_ id a Django application so refer to the Django docs for database configuration https://docs.djangoproject.com/en/1.11/ref/settings/